
Welcome to the third blog post in the GS DevOps Mate blog posts series. In the last two blog posts, we talked about Introductions to DevOps Mate, why we build it, its high-level architecture, how it is different from other Salesforce Deployment tools, and some of its salient features.
Before we start, we will be assuming that you have a BitBucket repo setup with Admin access in SFDX format and a ‘main’ branch. If you have a master branch instead of main, replace main with master wherever we are referring to main.
The setup will involve the following steps:
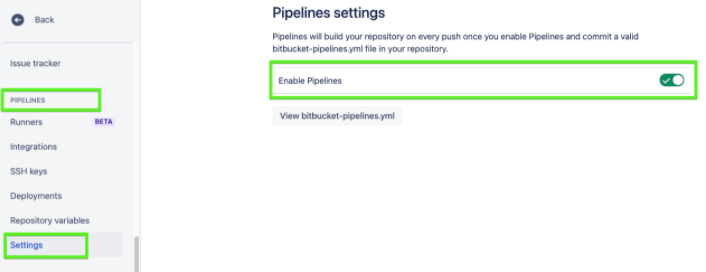
Enable the Pipelines.
Go to Repository Settings > Pipelines > Settings > Enable Pipelines
Create a YAML file by the name bitbucket-pipelines.yml in the root of the repository, as shown below with the image command. Make sure that the name is the same.
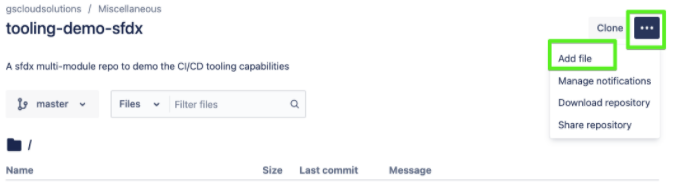
This step sets the GS DevOps Mate Docker image as the build runtime. All other commands would now run under the context of this image or, simply put, will run under the GS DevOps Mate Docker runtime and thus will have access to all the custom commands and resources we have packaged/dockerized in it.
You may wonder what are these $SOME_TEXT things in the steps defined below. So let’s discuss and sort them out first. These are Pipeline variables. They come in three flavors.
e.g. BITBUCKET_CLONE_DIR, BITBUCKET_BUILD_NUMBER
Let’s define Repository variables:
Go to Pipelines > Repository Variables
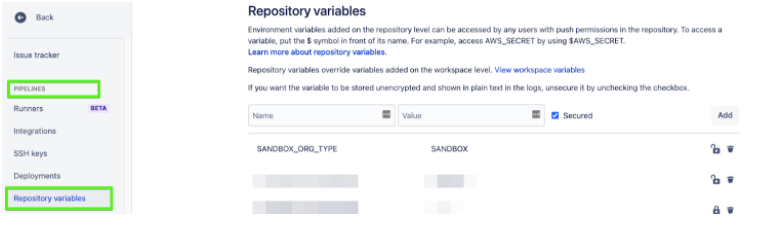
Define these variables with the following values:
LATEST_COMMIT_HASH_TAG: HEAD
SLACK_MESSAGES: off
MIN_OVERALL_CODE_COVERAGE: 90 (Can be anything from 75 to 100)
CI_CD_PROVIDER: BBPipelines
MAJOR_VERSION: 1
MINOR_VERSION: 0
PATCH: 0
TEST_LEVEL: RunLocalTest or RunSpecifiedTest or RunNoTests
MANIFEST_VERSION: 50
LOGGING_LEVEL: error or warn or info or debug or trace
QA_PACKAGE_DIR: QADir
UAT_PACKAGE_DIR: UATDir
PROD_PACKAGE_DIR: ProdDir
QA_ORG_TYPE: Sandbox
UAT_ORG_TYPE: Sandbox
PROD_ORG_TYPE: Production
QA_ORG_USERNAME: Username for a QA Org user with enough rights to deploy, Create, Read and Update custom settings data, preferably someone like System Administrator
QA_ORG_PASSWORD: Password and Security Token concatenated for the above user
e.g mySecretPasswordmySecretToken
UAT_ORG_USERNAME: Username for a UAT Org user with enough rights to deploy, Create, Read and Update custom settings data, preferably someone like System Administrator
UAT_ORG_PASSWORD: Password and Security Token concatenated for the above user
PROD_ORG_USERNAME: Username for a Production Org user with enough rights to deploy, Create, Read and Update custom settings data, and create Scratch Orgs, preferably someone like System Administrator
PROD_ORG_PASSWORD: Password and Security Token concatenated for the above user
As an example, we will configure the Feature Branch Workflow also known as GitHub Flow or GitHub Workflow as part of our CI/CD pipeline.
What is a Feature Branch Workflow?
You can read about it here and here. This flow can also be converted into Trunk based flow if there would be short-lived feature branches and rather than deploying from the master, we create a release branch before the release and deploy from the release branch.
Please do not confuse this with Gitflow Workflow which you can read here and here.
You can refer to this visual for the pipeline we are configuring here:

What is This pipeline/workflows/actions YAML, and Why do I Need It?
Bitbucket Pipelines and many other CI/CD services provide a flexible way to configure CI/CD workflows or pipelines based on the configuration file(s). These files are included in the repo as part of the source code, and the format for these files is mostly YAML; with this approach, your CI/CD flow is also defined in your source code. There are different opinions about source code and CI/CD flow coexisting, but we will leave that for another day!
Each of these services ensures that their pipelines or CI/CD workflow configuration files have a unique name or a folder structure. We will see that as we progress within these blog post series for various services. In the case of Bitbucket, it is known as bitbucket-pipelines.yml. Want to learn more about YAML concepts?
Here is a fantastic less than 9 minutes video.
The first pipeline is Pull Request Validation Pipeline:
Triggered On: Pull Request from feature branch (Regex ‘feature/*’ can be modified to support trigger from different branches if you wish)

Actions:
> Do you support better flow for CLI automation?
Yes, we do support JWT based auth for most of the commands as well. Please check the documentation here.
> You mentioned This Pipeline is Set Up for an SFDX Format Repo and My Organization is still Utilizing the MDAPI Format. What Should I Do?
You just need to replace all the sfPackages source-combined commands with sfPackages MDAPI commands in the YAML file.
> What is the Delta Package and How Does It Work?
It works in two ways:

Triggered On: Completion of Step 1
Actions:
Special Instructions: For the scratch org creation command which is sfOrgs createOrg, make sure to have a project-scratch-def.json file in the config folder in your repo
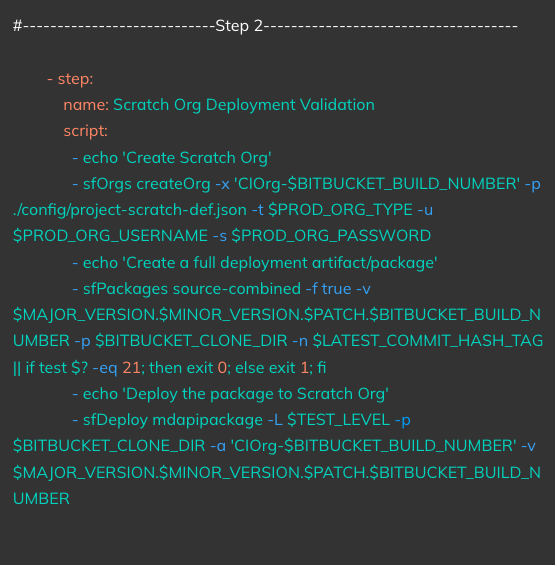
Triggered On: Completion of Step 2
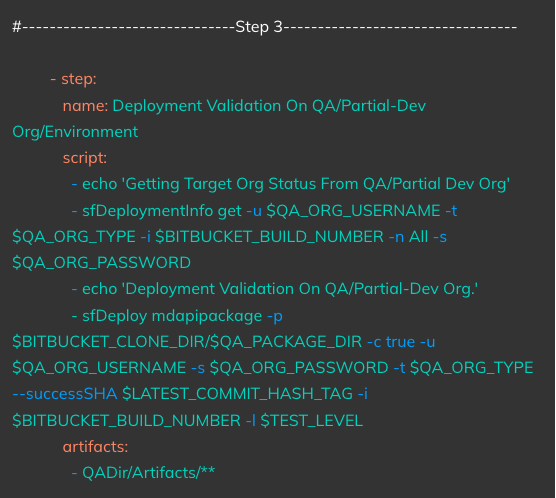
Actions: Runs a Deployment validation based on the artifact created in Step1 on the QA or a CI Org
Notes:
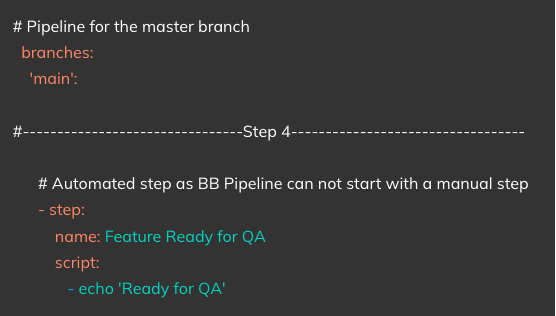
Now we will define the second pipeline and look into its steps. We can name it Deployment Pipeline.
Triggered On: When the feature branch is merged with the main branch
Action: Echoes a custom message.
Special Instructions: This is a dummy step, as BitBucket Pipelines can not start with a manual step and step 5 is a manual or approval-based step.
Triggered On: Manual Run/Approval
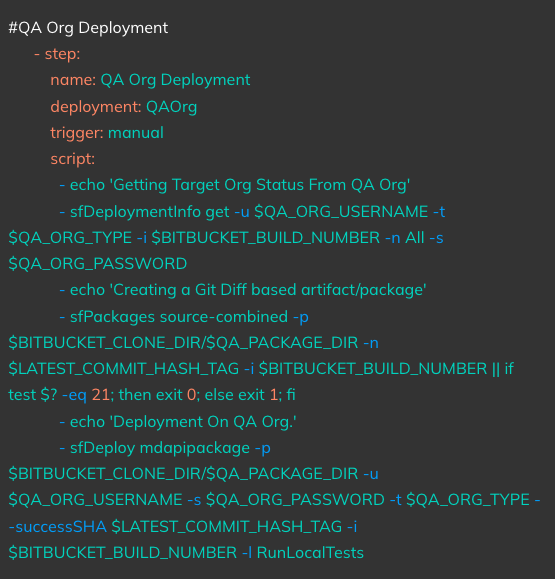
Action:
Triggered On: Manual Run/Approval
Action:
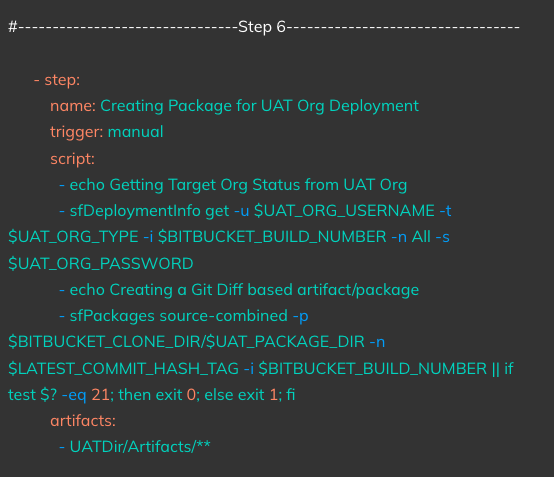
Triggered On: On completion of Step 6
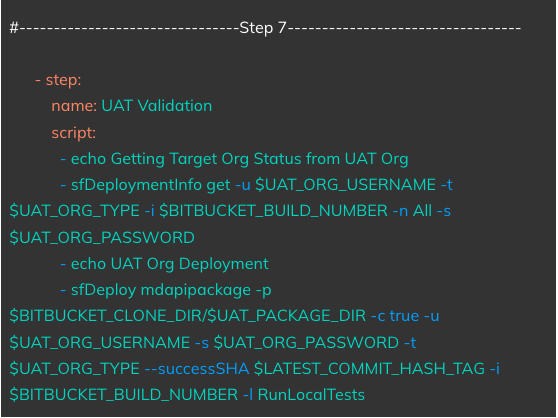
Action: Runs a deployment validation based on the package created in Step 6 on the UAT Org
Triggered On: Manual Run/Approval
Action: Runs a deployment based on the package created in Step 6 on the UAT Org

Triggered On: Manual Run/Approval

Action:
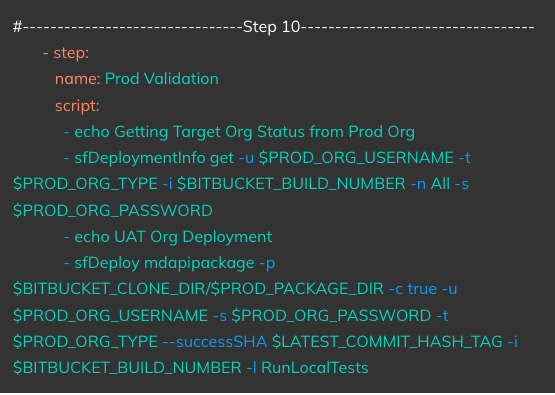
Triggered On: On completion of Step 9
Action: Runs a deployment validation based on the package created in Step 9 on the Production Org
Triggered On: Manual Run/Approval
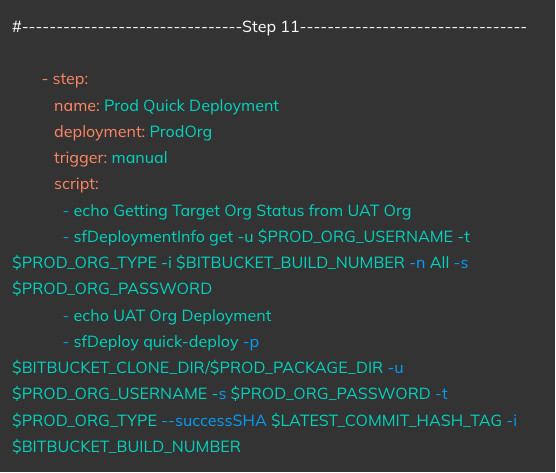
Action: Runs a deployment based on the package created in Step 9 on the Production Org
With this we are good to save the bitbucket-pipelines.yaml file. You can find the whole file here.
> Do I Need to Create a Package in Step 6 and Step 9, Can’t I Reuse the Package by Marking the Package Created in Step 5 as an Artifact?
The delta package depends on the commit SHA stored in the target Org. Thus it is required to create the package for each org separately. Moreover, there is a 14 days retention period for Artifacts in BitBucket Pipelines, after which they are not available. So if the gap between the time when the package or artifact got created vs the deployment on a particular Org is more than 14 days, the deployment will fail due to the lack of artifact it is looking for.
> You have explained at a step level what the YAML is achieving, I want to understand each of these commands!!
That is a fair ask as knowing these commands in detail will give you a lot more power and flexibility. If you are interested in knowing more about these individual commands, you can refer to the documentation here, especially the Core Idea and Core Commands sections.
Finally, we are ready to test the pipelines
Testing PR Validation pipelines: Create a PR from a feature branch to the main branch. This will kick off the PR Validation Pipeline. Make sure that your feature branch is following the naming convention which is feature/<any-valid-name>
e.g. feature/rks-221
Please note that based on the regex we defined in the pipeline YAML file, something like feature/rohan/rks-221 will not work, instead, you have to go with feature/rohan-rks-221 or you have to change the regex in the YAML
Testing Deployment Pipeline: Once the PR validation pipeline is successful and you are happy to merge, merge the feature branch to main. That will kick off the deployment pipeline.
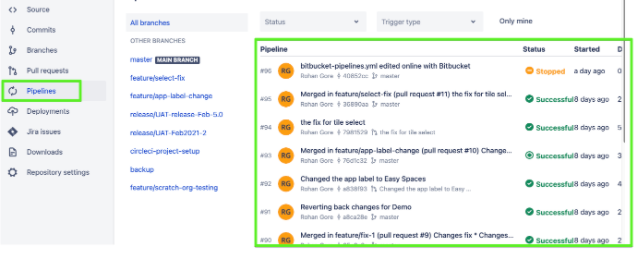
These pipelines can be monitored and checked by clicking on the Pipelines tab and then clicking on the individual pipelines.